vue router 源码通读
最近通读了一遍 vue-router 的源码,主要是想了解下面两个问题:
- 路由信息发生变动时,router-view 如何动态渲染对应的 component
- router-link 点击事件触发时,如何引发路由变化
1. 抽象数据结构
1.1 Router
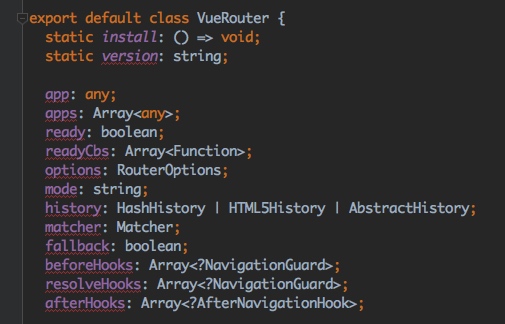
Router,也就是 VueRouter,在 Vue 根实例化时,将VueRouter作为router参数值传入 Vue 框架。
const router = new VueRouter({ |
VueRouter 根据构造函数中传入的option.mode 来实例化不同的 history 对象。
通过传入的option.routes(RouteConfig 数组),建立了 path 和 Component 之间的对应关系,这个关系存储在 VueRouter 的 Matcher 中。
在 VueRouter.install() 时,通过全局 mixin,hook 了 Vue 的生命周期 beforeCreate,并把这个VueRouter实例赋值给了this._router。
Vue.mixin({ |
接下来又在Vue.prototype上定义了$router属性,方便在各个 component 中通过 this.$router 引用到 VueRouter。
Object.defineProperty(Vue.prototype, '$router', { |
通过这个暴露出来的this.$router,可以实现“编程式导航”
this.$router.push({ path: 'home' }) |
在后面会了解到 push 、replace,go 方法只是在 $router.history 的方法上包了一层。
1.2 Route
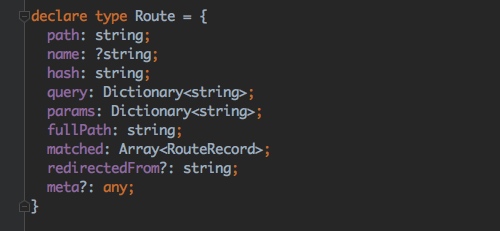
Route,路由信息对象,记录了路由所需的元信息和 URL 匹配到的 RouteRecord。
在 VueRouter.install() 时,Vue prototype 上注册了$router的同时,也注册了$route。
Object.defineProperty(Vue.prototype, '$route', { |
这里的 $route 就是 Route类型,它指向this._routerRoot._route,而_route 是通过defineReactive定义的响应式变量,其值双向绑定到了this._router.history.current。后者就是当前路由状态下激活的 Route 实例。
Vue.mixin({ |
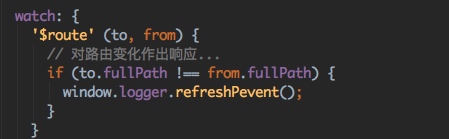
每当 _route 值被 set,Vue 就会通知所有依赖的监听者,比如$route。
通过监听$route 就可以对路由的变化做出响应。在每个子组件中通过this.$route 可以直接取到 query、params 对象,非常实用。
举个例子,当 path 变化时触发一个 page event,就可以这么写:
Route 中的 matched 数组存储的是当前路由状态下匹配的 RouterRecord。RouterRecord 中记录了路由对应的 component。
举个例子,某个 vm.$route 如下:
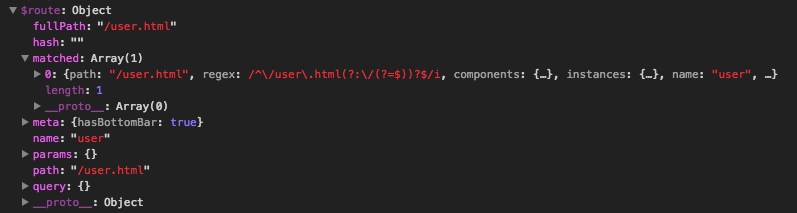
直觉上一个路由状态匹配一个 Component 组件似乎很合理,那为什么这里matched是一个数组呢? 这个和 vue-router 支持路由嵌套有关,这里不深究。
通过上面的分析可以总结 :
- vue-router 在
Vue.prototype上定义了两个属性$router、$route $router提供了 history 的几个关键方法:push、replace、go$route提供了路由元数据及对应的 component
1.3 History
vue-router 中的 history 是根据 mode 初始化的。
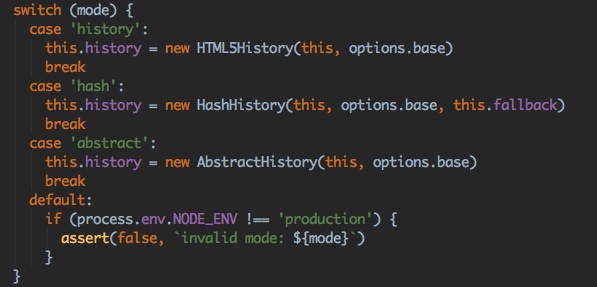
HTML5History、HashHistory、AbstractHistory 都继承于 父类 History。
-
HTML5History基于 html5 的 history 模式,通过history.pushState实现url 跳转而无需重新加载。 -
HashHistory利用#之后的部分路由,利用#改变不会触发页面请求的特性实现前端路由。 -
AbstractHistory内存中维护了一个数组来模拟路由 stack。
回顾问题1
- 路由发生变动时,router-view 如何渲染对应的 component
上文说到 $route.matched 数组记录着路由对应的component,而且$route会实时随着 _route 变化而变化。所以问题1的答案,关键在于 _route 会怎样跟着路由变化。
那么_route是怎么被 set 的呢?
路由信息变动无非以下两种情况:
- 函数式导航或者 RouterLink 组件,这两个本质都是调用
router.push或者router.replace - 浏览器回退按钮或者
history.back()
第一种情况,只需要在push、replace函数调用结束后,更新下_route就好了。
第二种情况,可以监听popstate、hashchange事件,在监听函数中更新_route
通过查看 History 的代码就知道 vue-router 也正是这么做的。
- 第一种情况:调用
router.push或者router.replace
在调用 this.$router.push 或者 this.$router.replace 时,其实是代理给了对应的 history 实例。
history 对_route的更新,具体表现在 VueRouter.init() 时, history.listen() 注册的回调。
history.listen(route => { |
这个回调函数作为 listen() 的参数传进来后被赋值给了 history.cb,那么 history.cb 在什么时候调用的呢?
调用顺序如下:
History.transitionTo() =>
History.confirmTransition.onComplete() =>
updateRoute()=>
this.cb()
部分相关代码也贴一下:
transitionTo (location: RawLocation, onComplete?: Function, onAbort?: Function) { |
无论是调用 this.$router.push 还是 this.$router.replace ,最终都会走到transitionTo(),从而更新_route
- 第二种情况:浏览器回退按钮或者
history.back()
对于HTML5History,在构造函数中监听了popstate,并在回调中调用了transitionTo。
constructor (router: Router, base: ?string) { |
对于HashHistory,则是延迟了hashchange监听,在第一次init() transitonTo 成功后,调用setupListeners监听popstate,或者hashchange
// this is delayed until the app mounts |
2. component
2.1 view.js
RouterView是一个函数式组件,也就是说它本身没有上下文,也不管理或监听状态。
export default { |
上面介绍到了,监听 location 变化的关键是响应式变量$route, render 函数渲染的正是 $route.matched 中存储的 Component。
第一个问题到这里就可以解答了。
RouterView 中有不少的细节处理值得注意
- render 使用的是 parent createElement() ,这样被 routerView 渲染的组件就可以解析 named slots。
- 利用 cache 来缓存
keepalive的inactive状态下的的 component - route 的 params 作为 component 的 props 传递(没被 component 注册的 props 会被当作 attribute 传递)
2.2 link.js
RouterLink 比较简单, 默认渲染为<a>节点,并设置该节点的 href 和事件。如果设置了 tag 名,则把 herf 和事件绑定到第一个<a>子节点, 如果没有<a>子节点则设置到它本身。
href 由 router.resolve 解析生成;事件回调函数里调用router.push或router.replace做跳转。
const handler = e => { |
到此,router-link 点击事件触发时,如何引发路由变化,这第二个问题也解决了。
3. 总结
vue-router 还有许多别的特点,比如
- 支持面向路由 的“AOP编程”(
navigation-guards), - 支持路由嵌套
- 滚动位置定位
配合 webpack 的动态 import 还能无痛实现路由懒加载。
如果用不到这些特性,同时希望能减少最终打包大小,经过上面的源码阅读,我们也完全有能力造一个符合自己需求的router轮子。
Author: deskid
Link: https://deskid.github.io/2018/04/12/vue-router/
License: 知识共享署名-非商业性使用 4.0 国际许可协议